Showing posts with label GF alternatives. Show all posts

Friday, December 30, 2011

A perfect way to close out the year: So many firsts!

I didn't intend to spend so much time away from my blog. The holidays are a time of confusion, worry and fear for newly diagnosed gluten intolerant folks, and so I had intended to share my favorite holiday recipes with you. And, then I had a family emergency.

My grandpa was not well, and we rushed to be at his bedside. Unfortunately, we got stuck in the first (and practically only) snow to track through the central United States. We did not make it in time to be with him, but we made it in time to support my family and to lean on them as we all grieved. After that, I've been in a funk. I haven't been able to get myself into the mood for much of anything. Christmas was something we tried to muddle through even though we never really felt like buying gifts or doing anything festive.

But we did it.

We got our annual Christmas letter out on-time, albeit very pared down from previous years. I think pretty much everyone got a gift from us. I'm behind on my thank-you notes, but I've done what I could to this point. The last item on my holiday checklist is my Three Kings Cake. I make one every January 6, hide a baby Jesus in it, and we make a game out of seeing who can find the hidden baby in a slice of cake. I have made a different style of King Cake every year, and I was searching through some of my favorite blogs to see what I could make this year.

One of my favorite bloggers is Gluten Free Girl, but she has started making all of her recipes by weight, which left me only able to enjoy her recipes visually. I felt unable to bake by weight, but her writing and culinary creations still inspired me.  As curious happenstance would have it, my dear best friend bought me a kitchen scale for Christmas. Only a week later I happened upon this gem of a recipe for Cardamom Fruit Bread on Gluten Free Girl's blog. I decided this bread would be a perfect challenge for me. My Grandpa had an uneaten fruitcake in his refrigerator before he went into the hospital. For whatever reason, I could not stop thinking about that fruitcake. I had never had fruitcake before, and had never really thought of trying it. I believed Johnny Carson that only one fruitcake was in existence and was re-gifted throughout history. But, there had been one in Grandpa's refrigerator, and this fruit bread on GFG's website looked like something I wanted to try. Besides, I had a kitchen scale now and had no excuse not to make it.

The only things I didn't have on hand were candied fruit and cardamom. Cardamom was easy to get, but I could not find any candied fruit without high fructose corn syrup. So, I bought golden raisins, dark raisins, chopped dates, green and red maraschino cherries (Yeah, I know, not healthy at all), and an orange. I chopped the cherries and the orange zest and then followed this recipe for candying fruits. Super simple! You should give it a try! I blanched the orange peel twice and then followed the syrup recipe. Once I made the simple syrup, I poured in some rum and then brought all of the dried fruit and orange peel to a simmer for 30 minutes.

I didn't have a bundt cake pan, but I did have an angel food cake pan. The end result was beautiful!


Lots of color throughout. My favorite part was the candied orange zest. Yum!


We worked on the bread for a couple of days, and then I decided to make french toast with the rest of it. I sliced up the leftover bread and used my recipe for Almond French Toast. I topped mine with a sprinkle of powdered sugar.
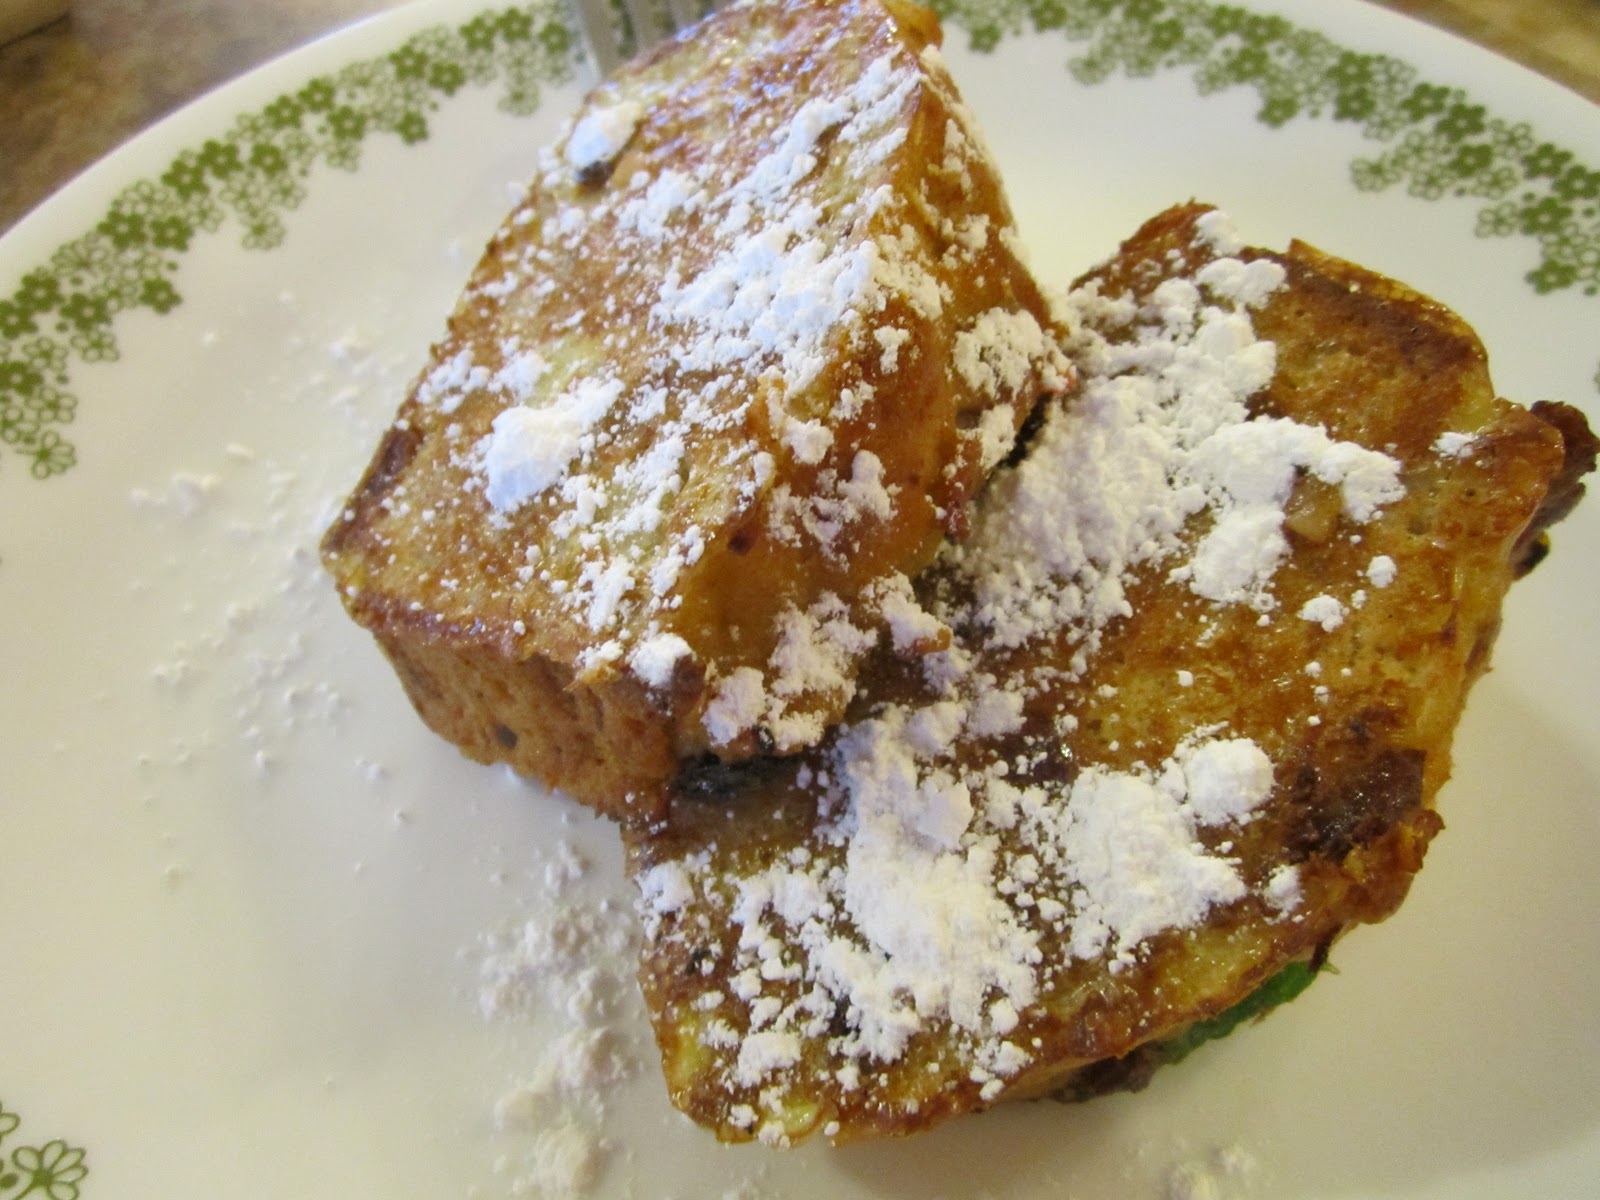


And so, my hope for you is that your new year will be filled with newness. Try a new recipe. Bake by weight, if the fancy strikes you. Go out and accomplish that goal you've always dreamed of but were too afraid to try. Candy some fruit. It really isn't that hard. Whatever it is that you do, do it to the best of your ability. But, above all else - love. Have a very happy, love-filled (and fruit-bread-filled) new year!


Friday, November 18, 2011

Upside Down Taco Pizza - and taco seasoning recipe

Every once in a while I get an idea in my mind for a recipe experiment and once it's in my mind, I can't stop thinking about it until I try to make it. On my most recent menu plan, I wanted to try making an upside down taco pizza with Food Should Taste Good's lime chips on top. I had never tried their lime chips before, but I knew they would be great because I've loved every other FSTG chip I've tried. Just in case you were wondering, I was even more pleased with the lime chips than I thought I would be. The lime flavor is so subtle, but so zesty at the same time. I don't know how they pulled it off, but these chips are perfect!

The upside down part was inspired by Crockpot 365's slow cooker puff pizza recipe (which is fantastic, by the way).

I have heard that McCormick's mild taco seasoning mix is gluten free, but I forgot to pick some up. That meant creating a taco seasoning recipe in addition to a taco pizza recipe. So, today you will get two for the price of one. :)

***Taco Seasoning
1 Tbsp. tapioca starch
1 tsp. chili powder
1 tsp. paprika
1/2 tsp. salt
1/2 tsp. cumin
1/2 tsp. dried minced onion
1/4 tsp. sugar (optional)
1/8 tsp. black pepper (pretty much two good-size dashes)

Mix all the ingredients in a bowl. There you go! To use for regular taco meat, brown 1 pound ground beef. Then add in either 3/4 cup water or 1 can (8 oz.) tomato sauce. Then mix in the taco seasoning mix. Cook until the majority of the liquid has been absorbed. Yum!


***Upside Down Taco Pizza
1 bag Food Should Taste Good lime chips (or about 15 chips), or any other GF corn chips
1 pkg. GF taco seasoning mix, or prepared homemade taco seasoning mix (see above)
1 pound ground beef
1 can (8 oz.) tomato sauce
1/4 cup water
1 cup grated cheddar cheese (plus a little for sprinkling on top, if desired)
1/2 cup brown rice flour
1/2 cup white rice flour
1 cup milk (or milk alternative, I used almond milk)
2 eggs
Shredded lettuce, and any other desired taco toppings

Preheat oven to 400. Grease 9x13 baking dish. In skillet, brown ground beef. Drain. Add tomato sauce and taco seasoning. Mix well and cook until some of the liquid absorbs. Add about 1/4 cup water to mixture. Stir to combine. Remove from heat.

In medium-size bowl, combine flours, 1 cup cheddar cheese, eggs, and milk. Pour meat mixture into bottom of 9x13, spreading evenly to coat. Pour flour-cheese batter over the meat, and use a spoon to spread it evenly over the top. Bake for 28-30 minutes, or until cheese has melted and puffy dough on top springs back when touched. Top with desired cheese, lettuce, and any other taco toppings. Last, top with lime chips. If you want your lettuce to wilt a bit, you can stick it back in the oven for about 1 minute.


Yummmm! My husband forced himself to stop after eating seconds (I think he ate 4 of these sections) because he wanted to have leftovers for lunch! I think that's a compliment!


For anyone wanting to make this NOT gluten free, just substitute 1 cup all purpose flour for the brown and white rice flours.

I read an article today that said pizza is the number one food people eat the night before Thanksgiving. If you traditionally eat pizza the night before the big Turkey Day, why not give this taco pizza a whirl. Hope you enjoy this as much as we did.

Friday, September 9, 2011

Sweet Onion Teriyaki Dip/Sauce

Before going gluten-free, I really enjoyed making stirfry with 1/2 cup of teriyaki baste and glaze as the sauce. I hadn't really found a sauce alternative that I enjoyed much, until tonight! I decided to make a dipping sauce for some soft pretzels I made earlier today (recipe will come in a day or two), and wasn't really feeling like the traditional cheesy sauce or anything with honey mustard. I came up with this dipping sauce, and liked it so much that I ended up making stirfry for dinner and stirring this in.

This works great as a dip or as a sauce. If you leave out the cornstarch and water mixture, I bet it would make an excellent marinade too.

***Sweet Onion Teriyaki Dip/Sauce
olive oil, for cooking onion
2 Tbsp. chopped onion (or more, as you desire)
1/2 to 1 tsp. ginger
1/3 cup soy sauce (make sure you're using gluten-free)
1/4 honey
1/2 cup water

1 Tbsp. cornstarch mixed with 3 Tbsp. cold water

In small sauce pan, saute onion in olive oil until onion becomes tender. Stir in desired amount of ground ginger. Remove pan from heat as you add soy sauce, honey and 1/2 cup water. Return to heat. Stir occasionally until mixture begins bubbling. In small bowl, mix cornstarch and cold water. Add cornstarch and water to soy sauce mixture, stirring continuously. Once mixture has thickened, remove from heat.

For my stirfry, I cut chicken into bite size pieces and cooked in olive oil until it was no longer pink. Then I added stirfry veggies and about 1/4 cup of water. Cover skillet and cook until veggies are desired tenderness. I had about 2 cups cooked rice in the refrigerator from a couple days ago, so I stirred that into the chicken and veggies and then added this teriyaki sauce. Quite good! Hope you enjoy it!

Wednesday, September 7, 2011

Gluten-Free, Dairy-Free Scalloped Potatoes

With this recipe, I think I discovered two things at once! Not only did I make scalloped potatoes that were dairy-free and still tasted good, I think I might have discovered an alternative to using a can of "cream of ____ " soup in future recipes. Oh, I hope I'm right! Not only was this recipe easy, it also was a money saver because I didn't have to buy an expensive specialty can of soup. And, a lot of those GF soups are not only expensive, but they use heavy cream (not dairy free, and NOT good for anyone's health in any way). So, here it is! (Not the greatest picture, but they tasted great!)


***Gluten-Free, Dairy-Free Scalloped Potatoes

4-5 potatoes, peeled and sliced
1 1/2 cups water
1/2 cup almond milk (or any milk alternative should work fine)
2 Tbsp. cornstarch or tapioca starch
1/4 - 1/2 cup diced onion
1 stalk celery, chopped
3/4 tsp. salt
dash of pepper
olive oil, for cooking celery and onions

Preheat oven to 375. Drizzle olive oil in the bottom of a medium-size sauce pan. Over medium heat, saute celery and onion until tender. Slowly add in water and almond milk. Heat to almost boiling. Very gradually, whisk in cornstarch or tapioca starch, until mixed well. If any stray clumps of cornstarch or tapioca starch remain, scoop them out with a spoon. Cook until mixture thickens slightly. In a 1 1/2 - 2 quart casserole dish, layer sliced potatoes. Pour thickened, "cream of celery" soup mixture over potatoes. Bake uncovered for about an hour, or until potatoes are tender and can be pierced with a fork.

Sunday, August 21, 2011

Breakfast Pie

Yesterday morning I woke up craving breakfast pizza. I wanted something breakfast-y with no cheese or milk, and I was coming up empty. I decided to make a breakfast pizza and skip the cheese, but then I realized I had no yeast. Ugh. So, breakfast pizza was not going to happen. Then I started thinking about quiche, but I didn't really want to spend the time making and rolling out a crust. That's when I got a weird idea.

Why not make a crust out of crushed Rice Chex? Ya know, kinda like a graham cracker crust, only not sweet? So, that's what I did!

***Rice Chex Crust
1 1/2 cups crushed Rice Chex
1/3 cup melted butter
1/2 tsp. salt
dash black pepper

Preheat oven to 350. Combine crushed Chex, melted butter, salt, and pepper in medium-size bowl. Pour mixture into pie plate and lightly press it into a crust shape. The mixture won't press totally flat, just try to even it out so that the whole bottom of the plate is covered as well as most of the sides. Bake for 10 minutes. Chex will lightly brown in the oven.

So, I had an awesome looking crust, but no idea what to put in it. I was still thinking about quiche, but I had no breakfast meat, and was trying to avoid milk and cheese. I used veggies from my garden, but you could use anything. I think asparagus would be fantastic. A meat addition would be great too. So, here's what I did.


***Breakfast Pie Filling
5-6 eggs
3-4 cherry tomatoes, diced
handful of pole beans, finely chopped

Heat oven to 400. Mix eggs and diced veggies together in a bowl, until eggs are thoroughly scrambled. Pour into prepared Rice Chex crust. Bake for 25 minutes, or until eggs are firm and beginning to brown. Enjoy!

Saturday, August 20, 2011

Chicken Parmesan Poppers/GF Chicken Nuggets

I don't know why, but it seems like most kids obsess over chicken nuggets at some point in their lives. We eat pretty healthily at our house, but my son still begs for chicken nuggets and tells me they are his favorite food. I don't know if it is because of the fun shapes they often come in, that they can be picked up, or if it truly has to do with their flavor. Whatever it is, my kids beg for chicken nuggets and I pretty much only make them for my kids when I have a GF leftover I can heat up while I cook their wheat-filled nuggets.

I confess, sometimes I miss chicken nuggets too. Not because I miss their pre-packaged, preservative-filled-ness, but because I love what you can do with them. They are pretty versatile, really. My husband was out of town today and my son (whose comfort food is chicken nuggets) has been sick since yesterday. While he was napping, I decided to make chicken nuggets for him, but I wanted to please him and me. So, I made some "homemade chicken nuggets" and heated up some leftover pizza sauce. Voila - I was having chicken parmesan bites and he thought they were chicken nuggets. Win-win! And, for people with celiac/gluten-intolerance who cannot have cheese, these do not have any cheese. Pardon the picture...I wanted to take a picture right after I made these, but my husband had the camera and he was out of town. So, here's a picture of the leftovers!


***Chicken Parmesan Poppers
1 pound boneless, skinless chicken breasts, cut into small bite-size pieces (I did two small chicken breasts from frozen)
1 1/2 cups gluten-free oats, pulsed in blender until almost like "flour"
1/2 to 3/4 cup mayo
salt and pepper as desired
Pizza sauce

Preheat oven to 425. In blender or food processor, pulse oats until they are somewhat "flour-like." You may need to move the oats around with a spoon or shake the blender gently as you pulse. The oats don't need to be ground totally fine, but you want them to be chopped smaller than they were when you put them in the blender! :)  Put the chopped oats into a medium-size bowl and add salt and pepper as desired. I used about 1/2 tsp. salt and a dash of black pepper. Put mayo into small bowl. Chop chicken into small, bite-size pieces. Working in batches, coat chicken with mayo and then cover with oat crumbs. Place prepared chicken onto lightly greased cookie sheets. Bake 12 minutes, then flip. Bake 12 more minutes, or until chicken is done and breading has begun to brown. Heat up pizza sauce for dipping, if desired.

These chicken bites held together surprisingly well and could be paired with any number of dipping sauces. My son ate several pieces and then said, "Mom, you can make this again sometime!"

Sunday, August 7, 2011

Taking Gluten-Free on the Road

I'm in the routine of gluten-free eating and cooking at home, but taking the gluten-free lifestyle on the road is a tremendous challenge. I stocked up on gluten-free snacks (organic rice cakes, Food Should Taste Good chips, and some nuts for protein), but so far I have struggled to find food at most restaurants where we've stopped. Perhaps I just haven't learned the ropes, but I have found it to be nearly impossible to eat at restaurants on this trip. Fast food places are particularly bad. I don't think I ever realized the obsession we have in America with breaded food until I was looking for gluten-free options on a fast food menu. Thank goodness we found a grocery store so that I could buy some foods that I knew were safe.

Continental breakfast at a hotel is pretty much a nightmare. I've made a mental note to remember that one. Even the items that appear to be wheat free (eggs, sausage, bacon, etc) are dangerously close to items containing wheat. As I stood back and watched other people getting their food, I realized I couldn't trust any of the utensils because people were using them on biscuits and then putting them back in the eggs. The oatmeal packets were by Quaker oats, and I've heard that Quaker does not insure that their oats are un-contaminated. I ended up having my wonderful husband take me to the grocery store so that I could feed myself. I was super hungry by the time I finally ate!

Most restaurants offer a salad option that would work out OK, as long as you leave off the croutons. Last night I had a philly cheesesteak (sauteed green peppers and onions) and had them make it without the bun. That was actually really excellent, and several people at my table were jealous because my food looked better than theirs!

Do you have any tips to share about eating gluten-free on the road? What things do you pack with you when you travel?

Friday, August 5, 2011

Product Review: Ore-Ida Sweet Potato Fries

I'm not big into couponing, but if I can easily find a deal I will take it. I've been using Swagbucks as a search engine and a way to save up gift cards for Christmas and birthday presents, and I  noticed that you can print coupons through their website as well. One of the first coupons it offered me was for Ore-Ida Sweet Potato Fries. I am a huge fan of sweet potatoes in all forms, but sweet potato fries particularly delight me. I went ahead and "clipped" the coupon online, but I doubted I would be able to buy the product. There had to be some hidden wheat in there. I was sure of it. I have noticed that a lot of frozen fries and potato products use wheat as a sticking agent, and I was guessing that this product would be the same way.

When I got to the grocery store, I made a bee-line for the sweet potato fries. I was totally thrilled to read on the side of the package: "GLUTEN-FREE." Ahh!!!! Joy!!!!

So, we had a family cook out, and I stuck some of these sweet potato fries in the oven. The fries held together nicely when I flipped them part-way through the cooking time, and they achieved a wonderful crunchy-but-slightly-soggy texture. I love that about good sweet potato fries.


Not the greatest picture in the world. I never realized how hard it was to get a good picture of orange food until I went through probably 30 pictures before I got one that wasn't simply terrible. These fries were great, and I definitely recommend them if you are a lover of sweet potatoes. And, if you hunt around, there are several coupons floating around online. Hope you love these as much as I did!

Tuesday, August 2, 2011

Vacation Bible School: A Gluten-Free Challenge!

Our church is doing Vacation Bible School this week, and as part of our outreach to the community, we are offering a meal right when Bible School starts. Last night there were sandwiches (cut into fourths) that were either cheese sandwiches, jelly sandwiches, or lunchmeat sandwiches. There were shredded carrot pieces, pretzel sticks, cookies and juice. I knew ahead of time that this was the menu being served, and so I knew that for the week I would have to plan to bring my own meal with me. So, my challenge has two parts: 1) to bring something that will fill me up and give me the energy to lead the music and skits for almost 70 kids, and 2) something that wouldn't make other people eating around me jealous that my food was different.

Gotta love eating gluten-free at a big community meal.

So, last night I made a turkey sandwich on Udi's gluten-free bread. If you've never had Udi's bread, go get some. It will change your gluten-free life. I know that if I'm going out of town or to visit someone who won't be cooking gluten-free, I can bring along some Udi's bread and be just fine.

I also packed some yellow raisins, and some "Sticks and Twigs" by the company with perhaps the best name I've ever read: Mary's Gone Crackers. The "Sticks and Twigs" were a taste sensation, to say the least, so I will have to do a product review of them a bit later on.

I also toted along my Camelbak full of water. I never leave home without it.

Tonight I will make myself another sandwich, and bring along some Food Should Taste Good chips.

What kinds of things do you bring with you when you know you are going somewhere that won't have gluten-free food? What are your go-to snacks? I'll keep you posted on how the rest of Vacation Bible School goes and what kinds of food I decided to throw in my re-usable lunch bag. Should be an adventure!

As a side note, I also noticed that one other helper was unable to eat with everone else. She is vegetarian and lactose intolerant. Next year I want to do something that can make those with food allergies still feel welcome.

Wednesday, July 27, 2011

Chicken in a Pot - and Spiced-Up Leftovers

I love cooking at home. I always have. And, now that I am eating gluten-free (and experimenting with dairy-free), it is difficult to eat away from home, so I tend to avoid it. Several of my friends have told me that they do not know how I have time to cook at home for all my meals. The simple, honest truth is that I have found that I have plenty of time to cook at home both because it is a priority and because I have a couple of versatile recipes in my back pocket.

One of those recipes is "Chicken in a Pot." It is easy, simple, basic. My Grandma used to make it, my parents still make it, and I make it fairly often.

***Chicken in a Pot
1 - 3 pound whole chicken, or 3 pounds of cut up chicken
2 carrots, sliced
chopped onion (as much as desired)
2 celery stalks, chopped
Salt and pepper, as desired
1/2 cup water
1/2 to 1 tsp. basil

Place in a crockpot and cook for around 4 hours on high or 7-10 hours on low, or until chicken is done. Use 1 cup of water if cooking on high. Serve over rice, or with desired side dishes. In place of carrots, celery, and onion, you may substitute whatever fresh or frozen vegetables you would like to use.

Super easy. I love this recipe, and I go to it often. After we've eaten what we want from the chicken in a pot, I will cut the chicken into bite-size pices, or shred it up. Save the veggies, and pour the broth into a container. Cool the broth in the fridge, scrape the fat off the top, and freeze it for later use. You know the broth is gluten-free because you made it!

Now, let's take that dinner and turn it into another! First, make up some homemade Italian dressing. You won't use all of it for this recipe, but you can keep it in the fridge to use over salad or as a dip for veggies as a snack.

***Italian Dressing
1 cup olive or vegetable oil
1/4 cup cider vinegar
2 Tbsp. dried minced onion pieces
1 tsp. dried basil leaves
1 tsp. sugar
1 tsp.  ground mustard
1/2 tsp. dried oregano leaves
1/2 tsp. garlic salt
dash black pepper

Mix all ingredients in a bowl. This makes a little over 1 cup of Italian dressing.

And now, for the spiced-up leftover.


***Chicken and Spiral Pasta
1 pkg. (12 oz. dry) brown rice spiral pasta, or whatever shape you want (I used Tinkyada brand)
leftovers from Chicken in a Pot
5 Tbsp. Italian Dressing (or more if you really want to notice the flavor)

Heat water to a boil. Cook pasta until al dente, drain, and rinse with cold water. This helps the pasta keep its shape.  Heat up leftover Chicken in a Pot. Stir chicken and veggies into noodles. Add Italian Dressing and mix well.

Voila! Dinner! This made so much for me tonight that I think I have leftovers for tomorrow's lunch too! This time around I took "Easy Street" and used a bag of frozen peas and carrots when I made Chicken in a Pot. Worked out just fine!

My kids and husband love this recipe. I hope you will love it too!

Monday, July 25, 2011

Two Recipes for Gluten-Free Flour Substitutes

Something the gluten-free diet did for me that I never expected: I suddenly became very interested in the ingredients in my food. Not necessarily in an obsessive way (though sometimes that happens to me too), but it was more that I became curious about where my food came from. I knew all-purpose flour had been made from ground wheat, but I had no idea that things like sorghum, millet, masa harina, and quinoa even existed. I'm sure I had seen the names before when I was reading a book or perusing a dictionary, but I didn't know what they were. I had no idea that they were edible. I was even more surprised to learn that those grains are staples in many other cultures.

The tricky part of gluten free baking is that wheat-based flour weighs more and has more sticking protein than gluten-free flours. Whole wheat flour is very dense and loaded with proteins. White rice flour...not so much. And so, when working with gluten-free flours, it works a lot better if you mix different flour types so that you achieve a weight that is closer to a wheat-based flour. And then, many recipes recommend that you add guar gum or xanthan gum to your flour mixture as a sticking agent (kinda like the gluten in wheat).

When I use xanthan gum, I tend to use 1/2 tsp. of xanthan gum per 1 cup of flour being used.

I don't know the real science behind what makes certain flour mixtures work. I know for many people, they discovered what worked best for them through many frustrating hours of trial and error. Honestly, I lucked out. I had no idea what I was doing and slapped together the flours I had in my cupboard. It has worked for almost everything I've used it in. The millet flour has a bit of a bitter flavor, so if you try this out and notice a bitter flavor you don't like, feel free to substitute something else for the millet. You could always just increase the brown rice flour. The recipes are laid out in "parts." I did this so you can make as much (or little) flour mixture as you need.  When I made my flour mixture today, 1 part was 1/3 cup. That yielded right around 3 cups of flour.

First, assemble all your supplies together.


***Gluten-Free Flour Susbtitute Recipe #1 - works best in baking that uses a lot of flour (more than 2 cups)

3 parts brown rice flour
1 part corn starch
2 parts tapioca starch/flour
1 part masa harina
1 part sorghum flour
1 part millet flour

Mix all the flours together. Instead of sifting, I washed out an old, plastic Folgers coffee can (with a snap-tight lid), and let it completely air dry. I put all the flours in there, snap the lid on and then shake it vigorously (while making sure I have a couple fingers holding the lid in place). If you want to do it a more traditional way, you can sift your flours together. The key is to get the flours so mixed together that it resembles one flour. For every one cup of flour you use, add 1/2 tsp. of xanthan gum to the recipe you are making.


***Gluten-Free Flour Substitute Recipe #2 - works best in recipes that use 2 cups of flour or less

1 part brown rice flour
1 part white rice flour

I worry less about sifting the flours together when I'm only using two. Just make sure you stir them well together before adding your wet ingredients. Again, 1/2 tsp. xanthan gum per 1 cup flour.

These have worked for me in many types of baked goods. I've made muffins, a King Cake for Three Kings Day, cinnamon rolls, and lots of other things. It isn't perfect, but it gets the job done. Feel free to adapt it if you find something that works for you.

Sunday, July 24, 2011

Cherry-Oat Crisp

I've been on a fruit kick lately. The produce all looks amazing at my grocery store right now, and I always get excited when I can eat fruits and veggies that are in-season. Usually when I go shopping with my kids, they beg for apples, bananas and grapes. This time they begged for grapes (green and red), which we got, but the ripe, dark cherries caught my eye. We were preparing for a family picnic, and the cherries looked perfect for a finger food for our meal-on-the-go. I pitted several cherries for the picnic lunch, and they tasted fantastic! But, there were lots of cherries left and I couldn't stand to see them go to waste. The result: a delicious cherry-oat crisp that can be eaten by itself or as a topping over ice cream.

The best part of the recipe is that it doesn't use any flour at all. It has very few ingredients, and will delight gluten-intolerant people and gluten-eaters alike.

First, wash and pit your cherries. Then place them into the bottom of a greased, 8-inch square baking pan.


I wanted the taste of brown sugar, but I didn't have any at home. So, I made some. Super easy! Just mix sugar and molasses. Grandma's brand Molasses is marked gluten-free right on the jar.


Work the molasses into the sugar until it looks like this:


Mix the brown sugar you just made, cinnamon, gluten-free oats (like the rolled oats at Bob's Red Mill), and oil together. Sprinkle over the top of the cherries. Now it is ready for the oven! Bake for about 40-45 minutes, or until the juice from the cherries starts to soak into the oats. The oats will remain crunchy. That's part of what I love about this recipe!


***Cherry-Oat Crisp

2 1/2 - 3 cups pitted cherries
1/2 cup sugar + 1/2 Tbsp. gluten-free molasses (or 1/2 cup brown sugar) - it is a pretty sweet treat. Feel free to reduce amount of sugar.
1/2 tsp. cinnamon
1/2 cup gluten-free oats
scant 1/4 cup oil

Preheat oven to 350. Pit cherries and place in greased,  8-inch square dish. Combine molasses and sugar in a medium-size bowl until brown sugar forms. Stir cinnamon, gluten-free oats, and oil into the sugar until well combined. Sprinkle sugar and oat mixture over the cherries. Bake for about 40-45 minutes, or until the oats begin to soak in a little of the cherry juice. Let cool for 10-15 minutes before serving. Serve either over ice cream, or by itself. If you'd like a goopier ice cream topping, or if your cherries aren't very juicy, place 1/4 cup water in the baking dish with the cherries before coating with the sugar and oat mixture.

Wednesday, July 13, 2011

Zucchini Crust Pizza

Giving up wheat was really hard for me. I have always craved bread. I remember going to the kitchen and eating bread right out of the bag during snack time. At Thanksgiving I would eat 10-12 of my grandma's Parkerhouse rolls. She made extra because she knew I would eat them. Pizza combined two of my favorite foods: bread and cheese. When I first discovered that wheat was the source of many of my health troubles, I was devastated. This could not be happening. I love food. I love bread. I love bread too much.

I'm sure some of you have had this conversation with yourself as you thought about the prospect of giving up wheat/gluten. It's hard. It is a lifestyle adjustment of huge proportions. The first two times I tried to give up wheat, I didn't stick with it. It was too overwhelming for me. And then, I realized I was only going to get through the change if I took it one day at a time. And so, I started with a favorite food. Pizza.

I gave myself the challenge of making a homemade gluten-free pizza. Fortunately, it did not take long for me to find something I loved. In fact, I preferred it to the previous pizza crusts I had baked before I quit eating wheat. I highly recommend the recipe for "Plain Pizza Crust" in 125 Best Gluten-Free Recipes by Donna Washburn and Heather Butt. My all-time favorite for a long time was "Plain Pizza Crust" topped with the "Roasted Vegetable Pizza Topping" recommended by the same book. It felt so good to eat pizza again. I made it when I had company, baked it for my family when they were in town, and my kids would ask for it. If I could make and eat pizza, things were going to be OK.

I was totally happy with my homemade pizza. I never really thought about switching it up. But then, on an online forum I was browsing, someone recommended making a zucchini pizza crust as a way to cut carbs and add in veggies. Zucchini? Really? Zucchini is one of my favorite veggies, but in a pizza crust? I was unconvinced. Unconvinced, but still a little intrigued. Imagine my delight when my wonderful husband came home from the grocery store with FOUR zucchinis because they looked so fresh on the produce shelf!

I used this recipe from Your Lighter Side: Zucchini Pizza Crust . The only change I made was that I baked the crust longer than the recipe called for. In my oven, it ended up being close to 20 minutes, but you have to be careful not to burn the edges of the crust. I used one huge zucchini, and it yielded three cups of grated green goodness. I decided to split it in half and make two pizzas and that worked wonderfully! Should you choose to make this on a pizza pan that has holes in the bottom, be sure to stick a cookie sheet on the rack below it to catch anything that might drip from the pizza pan.

I highly recommend Dei Fratelli pizza sauce. No high fructose corn syrup in the ingredients, and it says "Gluten Free" right on the can. Best part? It is in with the regular ingredients, and is actually one of the more economical sauces I've seen in my grocery store. Top with some cheese (I used mozzarella, parmesan, and a tiny bit of cheddar for some color difference) and whatever toppings you desire. I just used a yellow bell pepper because that was all I had in my refrigerator.

The pizza was fantastic! And the best part was that I fooled my oldest child! He had NO IDEA that there was zucchini in this pizza and he ate two slices!


For one pizza you will need:

1.5-2 cups grated zucchini
2 eggs
2 cups mozzarella for the crust
Pizza sauce (one can of Dei Fratelli easily tops two pizzas)
Desired cheese and toppings

Once you've topped your pizza, increase the baking temperature to 425 and bake for about 15 minutes, or until cheese turns light golden or starts bubbling.

I hope you enjoy this pizza as much as we have!

Friday, May 27, 2011

Great gluten-free alternative to bread crumbs

For those of you who follow my blog to read my writing updates, I hope you will indulge me now and then as I share some baking and cooking tips along the way. I will spare you the gory, medical details, but eating gluten-free has become a new way of life for me. After feeling lousy and having all sorts of weird medical anomalies happen to me, I grew tired of going to the doctor. All my tests checked out "normal" or "abnormal but not dangerous," and my gastro-intestinal doctor told me that I should just take stronger acid reflux medication and call it a day.

I was not OK with resigning myself to being on strong medication daily for life with no explanation. I asked for a celiac blood screen, and the result was negative. A family member had gone gluten free and had great success with it even though she also tested negative for celiac. After doing some research, I discovered that many gluten-intolerant people test negative on the blood screen. So, I decided I would cut wheat for a day and see what happened to me. Imagine my surprise (and relief!) when the very next day my heartburn was almost gone! I have days where I still ache, but I'm so much better than I was a few months ago. I'm hopeful that at some point in the future I might even be able to gain a pound or two! What an amazing thing that would be since I've barely weighed 100 pounds since high school!

Anyway, I'm getting into this far more than I intended to. Let me share what led to this blog post. I was in the kitchen this evening preparing dinner - salmon patties with remoulade sauce, sweet potato fries (well, actually they are made from garnet yams), and green beans - when I decided my gluten-free "bread crumb" idea was too easy not to share.

I love food, and I refuse to let eating gluten-free mean that I lose out on all the foods that make my heart sing. One of those foods (for me) is salmon patties. I read over the recipe on the Chicken of the Sea salmon packet and realized that the only ingredient I couldn't use was bread crumbs. I don't even know what made me think of it, but it works great. Instead of bread crumbs, I crush up Rice Chex! The recipe calls for 1 1/4 cups bread crumbs. I take 4 cups Rice Chex, put them in a gallon Ziploc bag, seal the bag, and then work out all my frustrations by crushing the cereal in the bag. (If you are environmentally conscientious, you can save the Ziploc bag to use again. Just make sure you don't get any ingredients that could spoil on or in the bag). Voila - instant GF bread crumbs! No baking. No looking for GF ingredients at specialty stores. Perfect for this rural-living girl! :)

Thanks for indulging me! I hope this post helps at least one other person!


Salmon Patties (adapted from the recipe on the Chicken of the Sea packet)
1 - 6 oz. packet skinless, boneless salmon
1/4 cup chopped green onions (I do about 3)
1/4 cup mayo
1 Tbsp. lemon juice
1/2 tsp. garlic powder
dash cayenne pepper (if you are adventurous)
1/4 cup red bell pepper (I leave this out)
1 egg, beaten
1 cup bread crumbs - (crush 4 cups Rice Chex in a bag - use one cup of the crumbs, and reserve the rest)

3 Tbsp. butter for cooking

Combine everything in a bow (except butter). Mix well. Form mixture into 4 balls. Rolls balls in remaining bread crumbs. Flatten into cakes about 1/2-inch thick. In skillet, melt butter over medium heat. Cook patties until golden brown on each side.

When they are finished cooking, I put them on a plate with a paper towel under the patties, and one over the patties to drain off the excess butter.

Remoulade Sauce (for dipping)
1/2 cup mayo
3 green onions, chopped finely
1 Tbsp. dijon mustard, or brown spicy mustard (for kick)
1/4 tsp. garlic powder
1 Tbsp. fresh parsley, or stir in dried parsley flakes

Mix all ingredients together. Goes well with salmon patties and other fish. :)